Hello, and welcome to my blog. I started to build this M4 composite for a Magazine article. I have changed my mind and have decided to use it as a build blog here at the Sherman Shop.
The Dragon kit has a few issues, so I will walk you through some of the corrections I’ve made to bring it up to standard. The main issue is the fact that Dragon provided both the Low Bustle and High Bustle turrets, but only the lower turret ring for the low Bustle. I’ll walk you through some of the corrections I’ve made.
The first step in any build is to assemble the lower and upper hull so I can address any fit issues. Here we see the assembled hull.
I ran into a problem on this step and this is a very good example of why I do it this way. The directions call out the wrong bolt strip at the top of the transmission housing. After looking over the sprues. I noticed that the correct bolt strip is included, (please forgive me, I can’t remember the part number). But, the strip does not fit. I had to carefully rework the top of the transmission housing and file some material away from the upper hull joint. This was done until I had achieved a perfect fit.
The fenders are tackled next in order to line up the sand sheild brackets. I used the bug bending tool to fold the PE where needed.
The correct position of the applique armor sits right on top of the sand shield brackets, they were installed so I could glue the armor patches in place.
The Large Hatch M4 Composite entered production in September 1943 with the low bustle turret that featured the cast cheek armor with no pistol port. In November, Chrysler transitioned to the new high bustle D78461 turret that added a loader's hatch and reintroduced the pistol port. Dragon was thoughtful by including both turrets in the kit. As stated, Dragon messed up by only providing the turret ring for the low bustle turret. So the logical solution is to build the low bustle version. But, Dragon also molded the very late low bustle turret with pistol port and loaders hatch. There is no know evidence that this combination was ever used on the M4 Composite. Some further corrections will be needed to make the correct turret.
I started making the corrections by gluing the loaders hatch into position, and then sanding the detail flush with the top of the turret. I also removed the protruding portion of the pistol port. Miliput was mixed and applied in the pistol port opening from the back side. I also applied a skim coat of filler over the loaders hatch to address any reaming seams. Once dry, these areas were wet sanded to blend the filler work into the turret.
I didn’t care for the look of the turret roof ventilator, so I removed the casting and replaced it with one from Tiger Model Designs. I also replace the turret lift rings that I scrounged from the parts box.
Mr Surfacer 500 was used to restore the cast texture from the modifications that were made. Working in small areas, I applied the surfacer and stippled with a stiff brush as it dried. Once the entire turret was covered, I used some worn out fine sand paper to buff down any unrealistic high spots in the texture.
And here is the completed turret with all of its fittings.
Excellent work. I'm planning on a Dragon turret for my M4A6 build which will need similar TLC
Question. I note that you've used the later 7054011 split hatch with bullet splash guards for the springs. Wouldn't an earlier hatch with securing latches be more applicable?
If I remember correctly, this was the only hatch in the kit. besides, I have seen several photos of Composites with this hatch combination on the D50878 Turret.
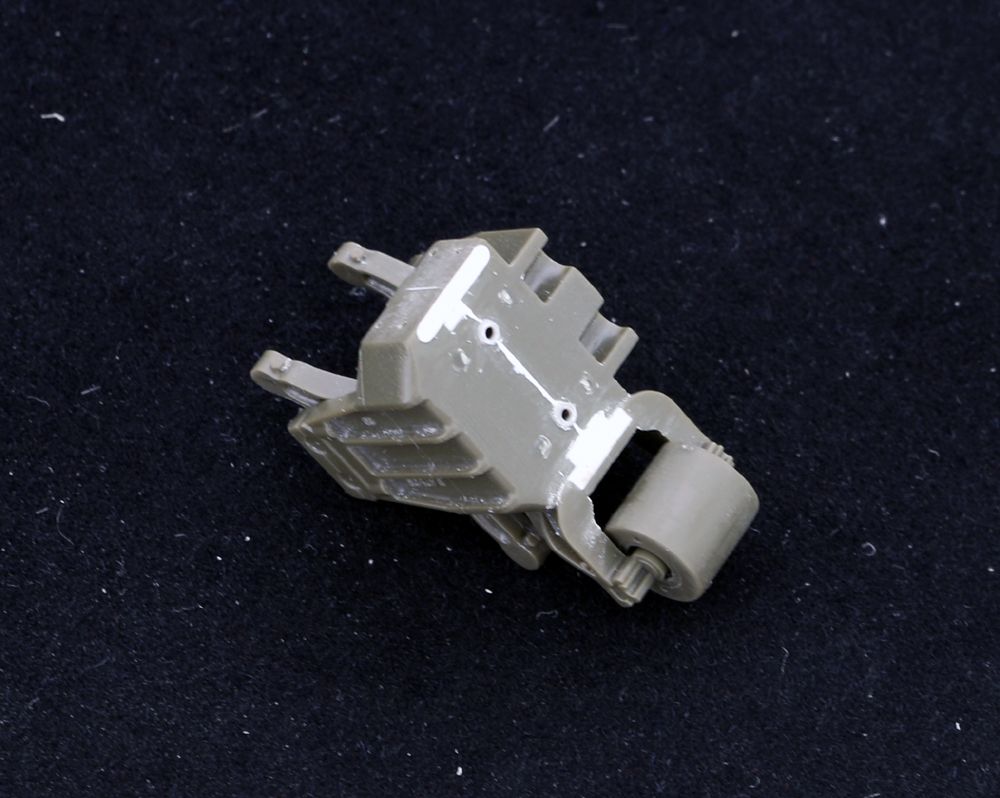
Moving on to the suspension, the bogies were assembled per the kit instructions. Before the top skid plate was added, the return roller bracket mounting holes on the front face were drilled out using the spacing jig from Click-to-detail.
Finishing off the front detail. I replaced the kit lifting rings with new ones from Tiger Model designs. New hatch handles were made from copper wire. And the photo etch light guards were supplied in the kit.
Here again, I didn’t care for the kit pioneer tools, so they were replaced with Tiger Model Designs Pioneer tools with molded on tie downs.
The tow cable was made up from Eureka XXL tow cable and formations cable ends.
I copied the spare wheel bracket from a photo of a Composite Sherman in France using strip styrene and a wheel from the parts box. Various Value gear items were used as stowage along with a couple of bits from the parts box.
The Dragon DS tracks are too long and look sloppy if not trimmed. 2 Links were cut from the track to achieve the right amount of slack.
And the last update for the week is the assembled model ready for paint.
The first step in painting was to give the model a base coat using Tamiya XF-62 lightened with a bit of XF-60. Once dry, more XF-60 was added to the mix for a lighter shade and sprayed in a random cloud pattern on the high spots and in the center of panels to break up the monotone look.
The details are base coated using various colors of Vallejo and Lifecolor paints.
A gloss coat of Future floor polish is applied to aid in decal placement and also provide a smooth surface for pin washes. Decals came from the spare box and even had a pre-arranged Registration number correct for a composite. That’s close enough for me! Once the decals were dry, I brushed on another coat of Future over the decals only to seal them in.
Pin washes have started using Wilder’s Deep Shadow wash. This is a perfect color for OD vehicles. Notice the difference between the washed and un washed sections of the applique armor plate.
Nice work. I'm looking forward to seeing the finished product
Damn I wish I had done your transmission fix on the Dragon Firefly I've got in the works. Will do that next time as it looks much better than what I've got on mine.


 - but have you thought about adding the VVSS adjustment points on top of each suspension unit?